Steampunk · Volume 1
Overview & the Styling Layer
What steampunk is in a clock hub organised by display technology, what this series covers, and the material it is built on
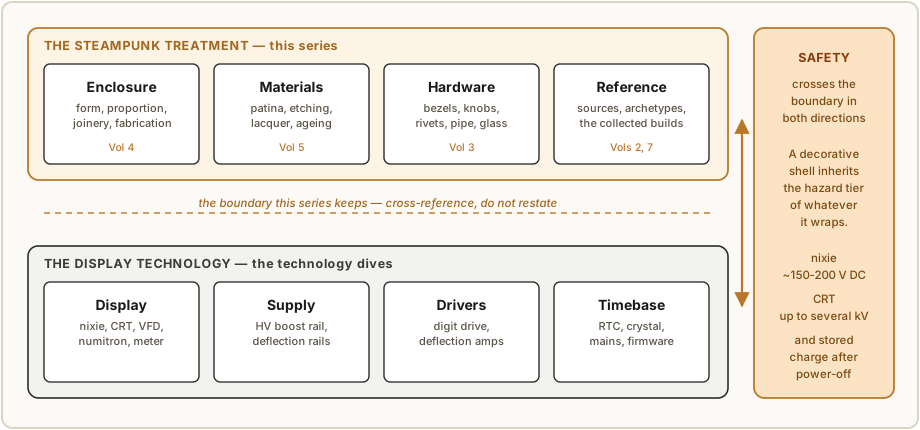
Every other deep dive in this hub is organised around a way of making a number visible — a glow discharge in a neon-filled tube, an electron beam steered across a phosphor, a heated filament bent into a seven-segment figure, a needle swinging on a hairspring. This one is not. Steampunk is an aesthetic category, not a display technology. There is no steampunk display, no steampunk drive circuit, and no steampunk timebase. What there is instead is a treatment — a set of material, formal, and finishing choices, drawn from a Victorian-industrial fantasy of what an electric clock might have looked like, that gets wrapped around an underlying display that some other volume in this hub already explains. A steampunk clock is almost always a nixie clock, a scope clock, a VFD or numitron clock, or a meter-movement clock, wearing brass. This series is about the brass.
Note — this is the steampunk treatment overview. Specific steampunk clocks owned or built by the owner — their design, construction, and operation — are documented as their own deep dives in this technology’s
clocks/folder, one folder per clock, each avol*.mdseries with a Design → Building → Running spine. This volume series covers the treatment in general; the per-clock dives go deep on individual units.
That framing is not a technicality. It decides what belongs in these eight volumes and what does not, and it is the single way this dive could most easily go wrong. The high-voltage boost converter behind a nixie tube is engineering that the Nixie series documents at length across three volumes; restating it here in slightly different words would add nothing and would create a second, drifting copy of the same material. The same is true of electrostatic deflection, of digit drivers, of RTC selection, of vector firmware. So this series cross-references the display dives and keeps its own attention on the layer they deliberately stop short of: the box, the metal, the finish, the hardware, and the visual tradition all of it is borrowed from.
1.1 What “steampunk” means in this hub
The word arrives here with two very different meanings attached, and it is worth separating them at the outset because only one of them is useful at a workbench.
The first is the literary meaning, which is narrow, datable, and covered in Vol 2: a label coined in 1987 for a small group of Victorian-set fantasy novels, as a joke on “cyberpunk.” The second is the design-and-craft meaning that grew out of it over the following two decades and is what a clock builder actually means by the word — a recognisable material and formal vocabulary of brass, copper, hardwood, leather, glass, exposed mechanism, gauges, rivets, pipe, and visible fasteners, assembled so that a modern object reads as an artefact of an industrial past that never happened.
For the purposes of this series the working definition is deliberately plain:
A steampunk clock is a clock whose enclosure, materials, finish, and decorative hardware are chosen to present a modern electronic display as a Victorian or early industrial instrument.
Everything in that sentence after “whose” is this dive’s subject matter. Everything before it belongs to another volume series. Note in particular what the definition does not require: it says nothing about gears that turn, nothing about steam, and nothing about the display being a nixie tube. The gears in most steampunk clocks do not drive anything, the steam is entirely notional, and the underlying display can be — and in the collected material frequently is — a VFD, a numitron, a dekatron, a panel meter, or a small CRT. What makes the object steampunk is the styling, which is exactly why the styling deserves its own reference.
1.2 What this series covers, and what it deliberately does not
The division of labour between this dive and the display dives is fixed and worth stating as a table, because it is the rule that keeps eight volumes from becoming a duplicate of thirty.
Table 1 — 1.2 What this series covers, and what it deliberately does not
| Subject | Lives in | Why |
|---|---|---|
| Glow-discharge physics, the ~170 V supply, digit drivers, anti-poison cycling | Nixie, Vols 2–5 | The display’s own engineering |
| Electrostatic deflection, CRT selection, deflection and Z amplifiers, vector firmware | Scope/CRT, Vols 2–6 | The display’s own engineering |
| Filament drive, meter ballistics, seven-segment decoding | Numitron, Meter-Movement, LED | The display’s own engineering |
| The hub-wide hazard tiers and the HV discipline they demand | _shared/safety.md and each display’s safety volume | One canonical statement, referenced everywhere |
| Where the look comes from, and what is myth about its origins | Vol 2 here | Nobody else covers it |
| The material and motif vocabulary — brass, copper, wood, gauges, rivets, pipe | Vol 3 here | Nobody else covers it |
| Enclosure form, joinery, and fabrication of a decorative case | Vol 4 here | Covered only as a nixie- or CRT-specific slice elsewhere |
| Brass etching, patina chemistry, lacquering, and reversible vs permanent ageing | Vol 5 here | Covered only in summary elsewhere |
| Getting a display safely inside a decorative case — venting, standoffs, clearance, bonding | Vol 6 here | The point where the treatment meets the hazard |
| A survey of the collected builds and what each gets right | Vol 7 here | This hub’s own collected material |
| Where the parts actually come from | Vol 8 here | Nobody else covers it |
Two entries in that table need a caveat. The Nixie series’ Vol 9 and the Scope series’ Vol 11 both carry an enclosure-and-finishing volume, and both explicitly describe themselves as the display-specific slice of a larger subject that lives here. That is the intended relationship: they tie the styling to one display’s mechanical and electrical realities — how a nixie’s soft leads want to be held, how a CRT’s neck must never carry the tube’s weight — while this series carries the general method. Where this dive and those volumes touch the same ground, this dive goes wider and they go deeper into their own hardware. Neither should be read as the other’s replacement, and Vol 6 here is written on the assumption that the reader will also read the safety volume of whichever display they are wrapping.
1.3 The material this series is built on
A styling dive stands or falls on its visual reference, and this subproject has an
unusually large one: roughly 550 collected images sit in 02-inputs/, in a
thematically-organised reference gallery of about 513 files across 35 themes, plus two
collected build write-ups, a donor-instrument photo set, and a small inspiration board.
Table 2 — 1.3 The material this series is built on
| Source | What it is | How it is used here |
|---|---|---|
reference_gallery/ (~513 images, 35 themes) | Web-gathered visual reference — build archetypes, materials, hardware, finishing — with a per-image provenance manifest | Read and surveyed throughout; the archetypes of § 1.5 and the vocabulary of Vol 3 are drawn from it. Reference only — not republished. |
Steampunk clock/ScopeInternals/ (18 photos) | A photographed teardown of a Waterman Pocketscope S-11-A chassis, shot in one session on 2026-era bench matting | Vol 7’s donor-chassis case study |
Steampunk clock/Ideas/ (21 images) | A named-clock inspiration board, traceable to one commercial maker, plus a Bendix aircraft indicator housing | Vol 7’s survey of finished work |
Lantern-Clock.pdf | A complete illustrated build write-up of a brass-and-walnut nixie lantern clock | The worked joinery and lacquering example in Vols 4 and 5 |
Steampunk Nixie Tube Clock (Instructables) | A nine-step copper-pipe nixie candelabra build, 2014–2017 | The worked copper-pipe example in Vols 3 and 4 |
The gallery is the asset that makes this dive possible, and it repays being looked at rather than merely counted. It also has a problem that must be stated plainly rather than glossed, because it changes how every image in it should be used.
1.3.1 The provenance caveat ⚠
The gallery was assembled by automated web image search, and a visual audit of all 35 themes conducted for this series found that a substantial fraction of it is not photographs of real objects. Three distinct categories of non-photograph are present and are identifiable on inspection:
- Synthetic (AI-generated) imagery, in some themes approaching the majority.
Filenames carrying
stable_diffusi,lexica_,premium_ai_image_, andpremium_photo_are reliable markers, and the images themselves give it away: pipe runs that connect to nothing, gear trains that cannot mesh, gauge faces with unreadable or impossible graduations, and bilaterally-symmetric “clockwork” wallpaper. The themes most affected are the industrial, gauge, gear/kinetic, and enclosure categories. - Watermarked stock-photo comps, visibly bearing Alamy, Dreamstime, Adobe Stock, and VectorStock marks.
- Commercial 3-D model renders (
cgtrader), which look like objects but are product visualisations, not builds.
The practical consequences run through the whole series. First, no gallery image is reproduced in these volumes; the gallery is reference, and its copyright status is arbitrary even where the image is genuine. Second, and less obvious, a synthetic image is worthless as evidence about how things are actually made: it can suggest a mood but it cannot be trusted for a joint, a fastener, a proportion, or a finish, because nothing in it was ever fabricated. Where this series makes a claim about construction, that claim is grounded in one of the two collected build write-ups, in the donor-chassis photographs, or in a named real maker — never in an image that could not be confirmed as a photograph of an object. Vol 7 reports the audit theme by theme.
This is worth generalising, because it is the reference-gathering lesson the whole exercise produced: a large image set proves that a look is popular; it does not prove that any particular image in it is real. Distinctness is not authenticity, and a manifest row is not provenance.
1.4 Decision tree — which treatment fits the build
Work top-down; stop at the first “yes.” Each branch names the volume that goes deep on it.
- Is there an intact vintage instrument on the bench that could house the clock? → The found-object conversion is the shortest path to a convincing object, because the proportions, the hardware, and the patina are already right and already consistent. Vol 4 § 4.6 covers gutting and re-using a chassis; Vol 7 § 7.5 works through the donor chassis collected here. Note the one-way door: a converted instrument is usually no longer restorable as an instrument.
- Should the mechanism be visible, and is the display safe to leave exposed? → The open frame or bell jar presentation. It is the most honest and the most dramatic, and if the display is a nixie or CRT it is also the most hazardous; Vol 6 § 6.7 sets the conditions under which it is defensible.
- Is the wanted object a piece of furniture rather than a piece of equipment? → The hardwood plinth with brass fittings, by a wide margin the most common form in the collected material and the most forgiving safety topology available. Vol 4 § 4.3.
- Is the wanted look plumbing rather than cabinetmaking? → The pipe-and-fitting frame, built from copper or brass tube and standard fittings. Vol 4 § 4.5.
- Is precision metalwork available, and is the goal an object rather than a clock? → The machined instrument, the top of the craft range. Vol 7 § 7.4 looks at what the best of the collected work does that the rest does not.
None of these branches is about the display. That is the point: the same IN-14 tubes and the same driver board appear underneath all five.
1.5 The five archetypes the collected material supports
Surveying the gallery and the collected builds together, the 35 nominal themes collapse into five recurring forms. Vol 7 walks through examples of each; they are introduced here because the rest of the series refers to them by name.
- The plinth. A low hardwood block — walnut, mahogany, oak — with the tubes standing proud on top, brass collars at the tube bases, an engraved nameplate on the front face, and very often a blue or amber underglow washing up around the glass. This is the dominant form, commercially and in DIY work alike.
- The bell jar. The whole movement — boards, wiring, tubes — placed under a glass cloche on a turned wooden base, presented as a Victorian specimen. Visually the strongest archetype in the gallery and the one that most depends on the wiring underneath being tidy enough to look at.
- The pipe frame. Copper or brass tube, elbows, tees, flanges, and valves used as actual structure rather than as applied decoration. The collected Instructables build is a worked example: a copper main tube with soldered fittings carrying hooked tube holders.
- The instrument. A case with a front panel, gauge-style bezels, knurled knobs, toggle switches, and a legend — the clock pretending to be laboratory or marine equipment rather than furniture. This is where the etched brass nameplate of Vol 5 earns its keep.
- The conversion. A vintage radio, scope, or aircraft-instrument chassis emptied and refitted. The collected donor set and inspiration board both sit here.
A sixth form — the freeform wire sculpture, with the circuit hand-soldered in brass rod as its own visible structure — appears in the gallery and is worth knowing about, but the collected material is too thin to document it properly and this series does not pretend otherwise.
1.6 Safety, stated once up front ⚠
This cannot wait for Vol 6, and it is the reason a styling dive carries a safety obligation at all.
A decorative shell inherits the hazard tier of the display it wraps, without
relaxation. The hub’s hazard tiers are set out in _shared/safety.md: a scope or CRT
build is the highest tier, with supplies reaching from hundreds of volts to several
kilovolts, stored charge after power-off, and an implosion risk in the glass itself; a
nixie build sits a tier below at roughly 150–200 V DC, which is sustained, hard to let
go of, and still present in the reservoir capacitors after the clock is unplugged;
mains-powered anything is a tier of its own. Wrapping any of those in brass changes
none of it.
What the treatment does change is the exposure, in three specific ways that this series is obliged to name:
- It invites handling. A beautiful object gets picked up, turned over, and shown to guests who have no idea what is inside it. A bench prototype does not. The finishing is precisely what converts a piece of test equipment into something a visitor will touch.
- It introduces conductive structure. The signature material of the aesthetic is metal, and brass trim, bezels, bolt heads, and pipe are all conductors. The characteristic failure is not a metal case, which is defensible, nor an insulating case, which is defensible — it is the mixed case, where handsome brass fittings on a wooden box are bonded to nothing and wait to become a charged, isolated electrode.
- It pressures the clearances. Every decorative instinct — make it smaller, make it tighter, hide the wiring, close the vents — works against creepage, clearance, and convection. Spacing is not negotiable for looks.
Vol 6 is the working volume for all three. It does not restate the discharge procedure, the bleeder sizing, or the measuring technique — those live in the display dives’ safety volumes, which must be read alongside it.
1.7 How this series is organised
Table 3 — 1.7 How this series is organised
| Vol | Title | What lives there |
|---|---|---|
| 1 | Overview & the Styling Layer | This volume: framing, the collected material, the archetypes, the decision tree |
| 2 | Where the Look Comes From | The literary coinage, the Victorian and industrial sources, and what is marketing |
| 3 | The Design Vocabulary | Brass, copper, wood, leather, glass; exposed mechanism; gauges, rivets, pipe; light |
| 4 | Enclosure Design & Joinery | Form, proportion, the five constructions, and fabricating them |
| 5 | Materials & Finishing | Brass etching, patina chemistry, lacquer schedules, and what is reversible |
| 6 | Mounting a Display Safely Inside a Decorative Case | Venting, standoffs, clearance, bonding — where styling meets the hazard |
| 7 | The Collected Builds | The gallery audit, the two build write-ups, the donor chassis, the named makers |
| 8 | Sourcing & Cheatsheet | Where the parts come from, plus a laminate-ready card and a glossary |
1.8 Photo and provenance policy
The figures in this series are of three kinds, and each is labelled in its caption. Project-original diagrams are vector line-art authored for these volumes in the hub’s paper-background house style. Licence-clean photographs come from Wikimedia Commons via the shared fetch engine, selected from categories rather than keyword search, and carry their credit verbatim in the caption. Figure slots are comment markers where a photograph of the owner’s own bench, tooling, or finished work belongs and does not yet exist; they are left deliberately empty rather than filled with a stand-in.
Nothing from the reference gallery is reproduced, for the two independent reasons given
in § 1.3.1 — arbitrary copyright, and an audited fraction that is synthetic rather than
photographic. Full attributions are recorded in photo_credits.txt alongside these
volumes.
1.9 References (Vol 1)
- Steampunk reference gallery and per-image manifest,
02-inputs/reference_gallery/(README.md,manifest.csv) — the ~513-image, 35-theme visual reference surveyed throughout this series. Lantern-Clock.pdf,02-inputs/— an illustrated brass-and-walnut nixie lantern build; the worked joinery and lacquering example of Vols 4 and 5.Steampunk Nixie Tube Clock(Instructables, nine steps),02-inputs/— the worked copper-pipe construction of Vols 3 and 4.- Donor-chassis photograph set,
02-inputs/Steampunk clock/ScopeInternals/, withwaterman_s11a_manual.pdf— the conversion case study of Vol 7. - Hub-wide safety baseline,
Clocks/_shared/safety.md— the hazard tiers and the rules every high-voltage build inherits. - Sibling display dives — Nixie Vol 9 (Enclosure, Finishing & the Themed/Steampunk Treatment) and Scope/CRT Vol 11 (Enclosure, Finishing & the Steampunk Treatment) — the display-specific slices this series is the general case of.
- Cross-technology decision matrix,
Clocks/_shared/comparison.md— where the steampunk treatment sits relative to the display technologies.
Comments (0)